Showing posts with label Linux. Show all posts

September 20, 2009

Making BSNL EVDO work in Ubuntu

A friend of mine recently told me that she is not using Linux because she can't configure her BSNL EV-DO in her Linux Machine.

See how I resolved the issue (She is using an Ubuntu Machine, so it is obvious that this tutorial is indented for those users with Ubuntu 8.04 or more).

So how do we do it ?

Plug the EV-DO to your USB port and then open your terminal (for those who don't know who to open a terminal, press alt+f2 and type gnome-terminal and press enter).

Type this sudo tail -f /var/log/messages

and you will see something like this in the terminal, if the modem is properly detected.
Sep 20 19:28:14 xxxxxxxxxxx-1510 kernel: [ 2821.869615] option 3-2:1.0: GSM modem (1-port) converter detected
Sep 20 19:28:14 xxxxxxxxxxx-1510 kernel: [ 2821.870366] usb 3-2: GSM modem (1-port) converter now attached to ttyUSB0
In this case the modem device is attached to ttyUSB0. Once you are done with it, you need to fill up the wvdial.conf file.

Spoiler Warning : sometimes you may not find wvdial.conf in your machine, don't worry you can install it using sudo apt-get install wvdialconf. Now you will be able to find the wvdial.conf in your /etc directory

Please save the below lines to your wvdial.conf file.

[Dialer Defaults]

Modem=/dev/ttyUSB0
Baud=115200
Dial Command = ATDT
Baud=115200
Dial Command = ATDT
init1=ATZ
init2=AT+CRM=1
Flow Control= Hardware (CRTSCTS)
Username =
Password =
Phone = #777
Stupid Mode = 1

Folks, if you don't know how to access the wvdial.conf, it is located in the /etc folder. You can open the terminal and type sudo gedit /etc/wvdial.conf and save the configurations in the file.

Now we are almost done with the configuration part.

To kick-start your Internet go to terminal and type sudo wvdial and stay connected always :)

February 6, 2009

Basic Migration Strategies

Most people are cautious about making major infrastructure changes, especially when it is a business infrastructure. Infrastructure migration includes changes in the computer networks and software setups,etc. Migrating to open source software might seem hard at first,but there are ways with which you can introduce Open Source Software into your business without risk. Here are a few guidelines for the migration to the Open Source Software.


Decision dilemma

The most important thing to consider while thinking about a Migration is how important is the migration is and how it is going to change your business ?. It's better to decide whether you want to make a switch or not. Before making a decision ask yourself these questions.

  • Is the client's employee population strictly dependent on a third-party application, plug-in, or devices that are only supported on proprietary platforms such as windows?

  • Has the client intensively developed custom applications based on native
    Win32 APIs and programming environments, such as Visual Basic® or
    other Windows scripting languages?

  • Is the client's entire employee population dependent on advanced Microsoft Office-based functions (for example, dependencies on complex macros)?
If the answer is yes to any of these questions, then the open source solution might be a less-suitable alternative. However if your decision is to move on with the migration you can do it, but it will require a more complex strategy that will require a careful consideration.

If the answer is no then you can proceed to the migration to open source software without any doubt.

NB : source of the questions - Linux Client Migration Cook Book v2

Slow and steady wins the race!

You can start the migration with simple changes, there will be a few services that can be replaced initially without much changes in the existing infrastructure. For instance you can add programs like Open Office, Firefox and Thunderbird without removing MS Office, Internet Explorer and MS Outlook in your desktop machines, this will help your employees test drive and learn open source software. It's also good if you can try a dual boot option where you can tryout Linux distributions while still running windows.

The easiest way to determine whether open source software is right for business, is to run it along with your normal programs.This has an added advantage, even if you experience errors and trouble learning to use new software, it won't interrupt your normal business.

Moving to Linux Distributions

Once you decided to use open source software on a daily basis, and you are used to it. Then you can start thinking about the operating system migration. It may sound difficult, but most Linux distributions can be installed without any hurdles.You can either dual boot your system with windows and Linux by installing Linux in a hard drive partition without affecting windows or you can tryout the Linux using some Live Linux CD.

Try some Live Linux Distributions

If you are still afraid of changing the operating system, then you can try some Live Linux distributions - Live distributions can run an operating system from a CD or DVD- to get familiar with Linux operating systems. The advantage of using Live distributions is that you can try the operating system without making any change in your computer.

Ubuntu is an easy to use Linux Distribution. You can either download your copy of operating system or you can order a free CD of Ubuntu from their site.There are a number of Live distributions available, like SUSE,Knoppix,etc..

Take some time to getting used to the new operating system, since they have a little different look and feel.

Large scale Migration

Once you are familiar with the open source operating system and software and if you are planning for a major infrastructure change to open source technologies, then you might consult any local open source consultants, They may be able to assist you in the migration process by helping you choose the best solutions and strategies needed to establish the new infrastructure to flourish your business.

Enterprise Enlightenment!

Computers and ITES (Information Communication Technology Enabled Services) are essential for every enterprise, no matter how big or small it is. Few years ago the only choice for IT infrastructure was to either run legitimate versions of proprietary software or use the pirated versions. But now Linux and other open source software are slowly dominating the business world, with their low cost high quality products. A recent survey revealed more than 50% of the web servers are using open source solutions such as Apache and MySql.

How Open Source Works ?


Open Source Softwares are softwares maintained by community developers (millions of them spread across the globe) rather than by a company, the source code of the Software will be openly shared, so that any one who is interested can develop, customize or enhance the software.

Read the Open Source Definition


Why Open Source ?


Open Source applications are evolved into powerful and quality products that can run on already existing hardware.

Other features include :

  • Low Requirements - open source applications require low memory and processing power (exceptions prevail) than the alternative applications need to provide similar performance.

  • Customizable - they are highly customizable. So that the user can create custom softwares based on the open source software to keep up with his standards or requirements.

  • Stability - compared to other proprietary alternatives, open source technologies are stable and less error-prone.

  • Secure - open source softwares are secure compared to its proprietary competitors.

  • Support - with strong online communities and forums, open source technologies are naturally the best supported software.

  • Low Cost - open source technologies helps us to setup infrastructures for almost free of cost.


How Open Source can help Business ?

As the recession put pressure on companies who are spending money on software infrastructures, which needs to be replaced soon within a few years time. This is where the freely available, high quality open source solutions lends a helping hand.There is a rich number of open source applications are available today for Web Servers, Databases, Content Management, Security, Development tools, etc. Open Source also helps to reduce maintenance cost and upgrading charges.Usually the softwares will be replaced or upgraded in recent years in almost all software infrastructures.


  • If you are planning any software purchase, you might check if there is any open source alternative available.In most of the cases Proprietary companies provide limited functionality software for low cost and later when you realize that you need more functionalities, you need to pay more for it. If there is an open source alternative is available, it will be almost free of charge, even if the software is a subscription based one it will cost only very less compared to the proprietary alternative.

  • If you are looking at operating costs, open source offers the least expensive computing environment for small business. In such cases open source also offers more scalability and efficiency at low setup and maintenance cost.

  • Open Source solutions can also help organizations to develop custom applications based on the existing Open Source applications. This provides more flexibility for organizations.

  • Companies can reduce licensing fee required to pay for the proprietary technologies. Most likely these technologies will be replaced with newer versions in short period of times, which requires purchase of license again.
There are a million ways open source technologies can help your business grow, we'll discuss some of them in this blog later.

Subscription based Open Source Softwares

There are subscription based Open Source Softwares, usually they are of very low rate compared to it's proprietary competitors. Red Hat is one of the biggest commercial open source company with revenue exceeding $500 million.

Difficulties in using Open Source Software

However, working with open source software comes with a lot more hardships than working with proprietary software. Companies that aren't working with commercial open source vendors or consultants will have to face a lot of hurdles on the way than they may be used to. But still there are lots of communities local and global available to help people who makes use of open source software, so no need to worry.

Read More Success stories


Keep coming back to this blog. I'll update it with some how-to articles and other articles to help you in your transformation to Open Source Technologies.

January 6, 2009

Mount your Linux Partitions in Windows!

Do you have all your movies and songs stored in Linux Partitions ? and do you want to use them while logged in Windows ? Here is a quick easy solution.

Ext2Fsd

A free program that allows you to mount your Linux partitions in Windows and have read/write capabilities.

Features

Ext2Fsd is an open source Linux ext2/ext3 file system driver for Windows systems (NT/2K/XP/VISTA, X86/AMD64), which enables you to mount your Linux partitions in windows like native windows partitions. Ex2Fsd also supports read/write capability on the mounted partitions. You can enable auto mount option to automatically mount the partition every time you login to windows.


Installation

Double click the downloaded exe file and follow the instructions, installation is simple like every other windows exe files. Just make sure that you check the below shown options


Make Ext2Fsd automatically started when system boots, Enable write support for ext2 partitions.

These options enables automatic startup of Ext2Fsd on system boot and enables write support on the Ext2 file systems respectively.


Configuring Auto Mount

Open the Ext2Fsd and double click on the drive you want to mount automatically. A settings window will pop up immediately.
  • all you have to do is choose Mount Point for fixed disk,need reboot option to use your drives like normal windows partitions.

Now you can listen to all your Music and watch your Videos seamlessly in windows and Linux.

Download Ext2Fsd

Obtain your copy of Ex2Fsd from http://sourceforge.net/projects/ext2fsd

December 26, 2008

Developer Manpages in Ubuntu

Manpages are very important for developers. Ubuntu doesn't come with Developer manpages pre-installed. So here is the simple way to install them in your machine. Happy Coding!

How to install Developer Manpages ?

  • Open Your Terminal and type sudo apt-get install manpages-dev .Make sure that you have an active Internet Connection.

Visit http://manpages.ubuntu.com/ to browse manpages online

November 7, 2008

DosBox : An MS-DOS Simulator for Linux

Wish to play your old M$-DOS games again ? You can use DOSBox to run your favorite vintage DOS programs in your Linux Machine.

DOSBox

DOSBox is a free sotware which simulates MS-DOS. It is intended especially for use with old computer games and programs.DOSBox does not rely on any Virtualization techniques it is a full CPU emulator, capable of running DOS programs that require the CPU to be in either real mode or protected mode.


Features of DOSBox

  • DOSBox is even capable of emulating many types of audio and graphics hardware. Graphics emulation includes text mode, Hercules, CGA , Tandy, EGA, VGA, etc. Sound hardware that can be emulated includes the PC speaker, AdLib, Gravis Ultrasound,etc.

  • Another advantage is, DOSBox can simulate peer to peer networking, this includes modem simulation over TCP/IP

  • It's very simple and easy to use.
click here to read more

How to install DOSBox in Ubuntu

  • Typing sudo apt-get install dosbox in your terminal will fetch you the dependency libraries and install DOSBox in a few moments.When the installation is completed you can type-in dosbox in your terminal to acces DOSBox.

External Links

NB: If you are looking for a more advanced windows software emulator where you can play your 3D games and other Softwares, you might probably give a look at Wine.

Amarok : Best Music Player for Linux

Computer is not just a Hacker-Box any more, it's revolutionizing our world with its entertainment capabilities. Let's make this more easier with Open Source.

Amarok !

Amarok is the music player for Linux and Unix with an intuitive interface.We all know how hard it is to maintain a good music collection, however Amarok makes organizing your music easier than ever.


Features of Amarok

Amarok is not just like any other music player available, it's more than a simple music player.It can be used to organize a music library into folders according to the information such as artist,genre and album, it can be used to manage music tags, album art,etc

  • Amarok can help you in associating Album art (Cover art) with a particular album, and retrieving the cover art from Amazon

  • Creating and organizing playlists are more easier with Amarok it even supports dynamic playlists.

  • Synchronizing, retrieving, playing, or uploading music to the following digital music players like iPod.

  • Displaying artist information from Wikipedia and retrieving song lyrics.

  • Last.fm support, including submitting played tracks (including those played on some digital music players) to Last.fm, retrieving similar artists, and playing Last.fm streams.

  • You can even manage and listen to your favorite Podcasts using Amarok.

  • The integration of Magnatune, a non-DRM digital music store, enabling users to purchase music in Ogg, FLAC, WAV and MP3 formats.

Disadvantages

  • If you have own a collection of DRM protected Music, You must be disappointed.

How to install Amarok in Ubuntu ?
  • Just type-in sudo apt-get install Amarok in your terminal.

Important Links

October 28, 2008

VirtualBox : Fix "Spawning Session" problem

After installing some Ubuntu updates, I noticed that I couldn't start any Virtual Machine in Virtual Box.It shows a “spawning session” dialog which stuck at 0% forever.


Solution for the problem

If you can't close or terminate your VirtualBox program which is stuck with the 'Spawning Session' problem, just open the terminal and force kill the VirtualBox
  • type sudo killall VirtualBox in the terminal
Now you need to recompile the kernel module for VirtualBox, It's not that hard
  • just type sudo /etc/init.d/vboxdrv setup to recompile the kernel module and wait for a few seconds
You will get an output like the following
  • * Stopping VirtualBox kernel module * done.
  • * Removing old VirtualBox kernel module * done.
  • * Recompiling VirtualBox kernel module * done.
  • * Starting VirtualBox kernel module * done.
Now you can start playing with your virtual machines.

October 25, 2008

Elisa : Turn your Linux Box into a Media Center

Jealous with that Jaw-dropping Front Row or Windows Media Center ? Checkout Elisa, an open source cross-platform media center with simple looks and stable performance.


The Elisa Media Center boasts of many advanced features that will help you turn your Linux Box into a Media Center. Everything is packed in a simple interface with a professional look and feel.

Features

Movies - Watch your Video files and Movies, you can even watch your favorite videos from youtube and other sites.


Music - Listen to your Favorite Songs and organize your music collection by artists or album covers.


Photos - Entertain your friends with your animated slideshows and image previews.


Peripheral Devices - Let it be an iPod,External Hard Disk or a Digital Camera, Elisa Automatically detects them all.


Internet - Let it be Youtube, Flicker or other popular sites. You can have all of them at your fingertips.


Click here for a more detailed list of features.


Installing Elisa in Ubuntu

  • Installation of Elisa in Ubuntu and its Variants (Xubuntu,Kubuntu) are as simple as plucking a flower, just type sudo apt-get install elisa in the terminal.

Configure Your Media Directories
  • If your music and movies are already in the music folder and movies folder in the home directory, you need need not worry about this step.
  • Most probably you will have your music and movies located in another drive, in that case you can simply create a symbolic link.
  • consider you have all your music located in /home/user/Desktop/Test/ all you have to do is just create a shortcut of that directory and place it in the music folder. You can either use ln -s (from terminal) or Graphical User Interface for creating a link.

Pros and Cons
  • The Elisa is simple to install, configure and use.The interface is very good and clutter free.
  • There are a few problems occured occationally while playing video files, other than this there were no serious disadvantages.
Downlaod Elisa

Obtain your copy of Elisa from http://elisa.fluendo.com/


October 5, 2008

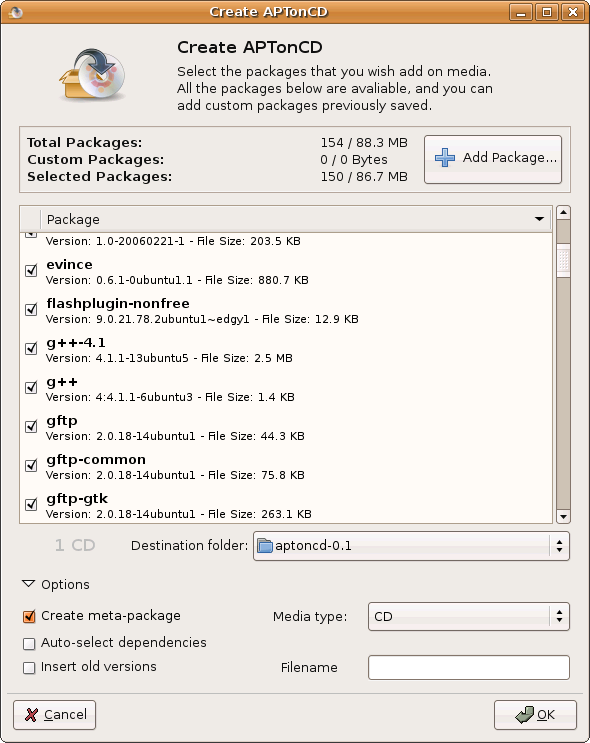
APTonCD : Create a Portable Package Repository

You've just finished installing Ubuntu and configured it with all your favorite applications, what if for some reason you now have to re-install it and don't know what packages you need to install.

This is hard, right ? Just checkout this cool application
APTonCD.

What is APTonCD

APTonCD is a simple Graphical Interface tool which enables you to create DVDs or CDs with all the packages you have downloaded using apt-get or Aptitude.It can also be used to create disks with all your pakages located in a specific repository. You don't need internet connection anymore when you have to re-install everything.


Features
  • Backup - Backup all the packages downloaded via aptitude, apt-get and synaptic.

  • Transport - You can carry all your favorite packages with you and install them anytime anywhere without worrying about an internet connection.

  • Download - You can downlaod and Backup an entire repository or a specific section to a CD or DVD.

  • Share - Share your favorite applications and packages with your friends.

External Links

Official site of APTonCD is http://aptoncd.sourceforge.net/

You can obtain your copy of APTonCD from the download page.


September 19, 2008

Ubuntu : Install Windows Applications with Wine!

Is it possible to install Windows applications in Linux ? this is the question often people ask me when I suggest to use Linux instead of windows. So I decided to write a how-to on installing windows software in Linux.

What is Wine ?

Wine is a FOSS software which aims to allow Unix-Like computer operating systems to install and execute programs written for Microsoft windows.


How to install Wine in my Ubuntu Machine ?

  • sudo apt-get install winewill install the wine from internet Repositories, when the installation is successfully completed a menu item will be placed in the applications menu in the top panel.
Using Wine to install Programs

  • Go to Applications ->Wine -> Configure Wine


Click on the Configure Wine Options shown in the menu. A new configuration window will prompt you to configure wine.There are two ways to open a windows application using wine.

  • The first is to select the Applications Tab on the configure Wine box and click on the Add Application Button, Locate your .exe file and add it.For this example I tried putty.exe (click to obtain your copy!).
  • The second way is the simplest,Just double click on the .exe file that you wanted install in your Linux (the problem with this is, sometimes this methode may not work).


Now it's time to play with your programs! Wine creates a folder called .wine in your home directory, you can access your virtual c drive there.
Opening Applications From terminal

  • open your terminal and type cd ~/ to enter your home directory
  • now type cd .wine/drive_c/ and press return to enter your virtual c drive
  • list the files using ls command and you will find Program Files Directory there.Just browse through and find your program and wine it (just type wine program_name.exe).


Opening Applications Directly
  • Just double click on the application that you want to open, and the wine will open it for you.
Okey now it's time to switch to Linux, Stop using windows ... :)

Ubuntu : Installing Flash player

Flash player is one of the most important plugin that every Netizen needs for his everyday life. So Here is how to install a flash player in Ubuntu.


Installing Flash Player

There are several ways to install flash support in Ubuntu, here we are discussing two relatively easy methods

  • This is the easiest way to install flash player in Ubuntu, Just type in sudo apt-get install flashplugin-nonfree ,this will fetch and install the plugin from internet (this works only if you have an active internet connection).
If you don't have an internet connection, you may need to install flashplayer plugin manually.

  • Go to http://www.adobe.com and download the Adobe flashplayer (the tar.gz download,remember do it all from linux, otherwise you will be redirecte to windows ).In this example we consider the file is downloaded to ~/Desktop (~/ represents the user's directory in linux)

  • change directory to ~/Desktop

  • tar xvfz install_flash_player_9_linux.tar.gz command will untar the tar file and change directory cd install_flash_player_9_linux/

  • sudo ./flashplayer-installer will invoke the installer and you will be asked a few questions.Answer the questions appropreately an the installation will be completed succesfully

NB: if the installer is aking for the installation path of mozilla then just enter /usr/lib/mozilla

This is all.Now you are ready to rock with youtube and metacafe!

September 18, 2008

Xubuntu : Mount your OS X Partitions!

Xubuntu

Xubuntu is a light variant of Ubuntu with a simple interface and Low resource usage (more like a cut-down version of Ubuntu for low end machines). The User Interface (Xfce) is clutter free and simple. But when I installed it in my Mac Mini, I was not able to access my bluetooth keyboard (instructions to setup yours) and OS X Partitions. Mounting OS X partitions in Xubuntu is easy; let's have a look at it.


Creating a Mount Point

A mount Point is the place where you can mount the Partitions. Just create a directory where you want to mount your OS X partition (I created a mount point in my Desktop).

  • mkdir ~Desktop/your_drive_name_here
Now we need to find the partition where the OS X data are stored. fdisk command can be used to find information of your OS X partition.
  • sudo fdisk -l
Mounting the partition

Mounting is not a hard job in Xubuntu.
  • sudo mount -t hfsplus /dev/sda3 ~/Desktop/your_drive_name_here
Now everything is done,you can start using your OS X Partition in Xubuntu.

Unmounting the partition

To demount the partition you need to unmount it manually.
  • sudo umount your_drive_name_here

NB: If you wish to automate mounting process, you just need to edit the fstab file and your partition information there.
  • sudo gedit /etc/fstab will open fstab file in gedit (use vim instead of gedit, if it is not available in your machine).
find-out the below information within the file.
  • #dev/sda3
    /dev/sda3 _mountpoint hfsplus defaults 0 2
here replace /dev/sda3 with your Mac Partition information obtained from the fdisk -l command and replace _mountpoint with your mount point directory. Now you can save the file and reboot the machine. You'll have the partition mounted automatically when you login.

August 8, 2008

CinePaint : Professional Open Source raster graphics editor

Some of my friends who work in the film industry asked my what open source can offer for them ?
So I decided to introduce some open-source tools available for Film industry (Hey the first OpenMovie is out there!)

CinePaint is an open source raster graphics editor, it is one of the most successful open tool in feature motion picture work today. CinePaint is started as a fork for Gimp 1.0.4 version. CinePaint has so far been used for films such as Scooby-Doo, Harry Potter and the Philosopher's Stone, The Last Samurai and Stuart Little.

Why CinePaint ?

The first reason for why I prefer it is because it is an open source software (think of Photoshop, Corel Draw,etc and their cost!), that means this is free and you can even customize it for your personal needs. And yeah we all know this is a good software since it is already used for several movie projects including the Harry Potter.Now it is your turn to find out why you need it, try it before you decide .

Features of CinePaint ?

CinePrint has vast dynamic range : 16-bits per channel (64-bit RGBA)
  • that's more range that can be displayed on a computer monitor,since the computer monitors are 24-bit RGB, and it is important when working with a film.It helps to prevent loss while editing.
Still Photographers and CinePaint
  • With 35mm support it helps still photographers too. Still photographers can think of CinePaint as having many more F-stops of range .CinePaint also handles 8-bit, 16-bit linear, and 16-bit float images.
  • CinePaint features the support for loss less formats such as TIFF,RLE,Cineon, and EXR, this helps the photographers to preserve the details of their photos without any loss, remember some of these formats are not even supported by Photoshop Gimp or other tools.
Other Main Features
  • Frame Manager
  • Onion Skinning support
  • 16-bit floating point support for HDR and 16-bit colour managed work flow for photographers and printers
  • Available in the following platforms: Linux, Mac Native, FreeBSD, NetBSD, Windows XP (Windows version is however broken now, a new version is in progress.)
Cons of CinePaint

I just tried out Cine Paint for a little image editing and found it is a little bit cluttered while considering the GUI (even though with expose feature of mac we can take advantage of this).But still it is a pretty good tool with a lot of features and it is pretty easy to learn this software even without any help.

You can Download CinePaint here

August 7, 2008

Ubuntu : Setup your Bluetooth Keyboard

I have a Mac Mini with Apple wireless keyboard and I use Ubuntu.This tutorial may help you fix your Wireless keyboard problems with Ubuntu.This is a pretty easier task.

This tutorial will work with all bluetooth keyboards.

Discovering the Mac address of our Keyboard

We need the mac address of the keyboard to complete the setup. I'll use keyboard_mac_address which you should replace with your keyboards Mac address.Make sure your keyboard is on and ready to be visible in the computer(turn it on and press any key).

Now open the terminal window and run the following command

hcitool scan

the result will be some thing like :

Scanning . . .

keyboard_mac_address keyboard_name

here the keyboard_mac_address will be the mac address (e.g. 00:00:00:00:00) of the Keyboard and the keyboard_name will be the name of the keyboard.


Adding Keyboard to the configuration files

now run sudo gedit /etc/bluetooth/hcid.conf in your terminal to open the configuration file in root mode.

a file will be opened in gedit, now you need to add the following lines to the end of the file.


device keyboard_mac_address {

name "keyboard_name";

auth enable;

encrypt enable;

}


You need to replace the keyboard_mac_address with the actual mac address of the keyboard and keyboard_name with the actual keyboard name.

Restart the Bluetooth service

Now we need to restart the bluetooth services

run sudo /etc/init.d/bluez-utils restart in the terminal window

Pairing the Keyboard

sudo hidd --search

As soon as the keyboard_mac_address appears, you must enter a PIN code into the keyboard. It must consists of numbers not using the numpad.Type this keyboard in to the keyboard and press Return (Enter).A window will pop asking you for the number you just entered on the keyboard. Certain times my Apple wireless keyboard connected without this PIN code entering.

Enabling automatic reconnection

type sudo gedit /etc/default/bluez-utilz to access the configuration file in root mode.

Find the code HIDD_ENABLED=0 in the configuration file and replace it with HIDD_ENABLED=1

Now you can reboot your machine and hopefully they will be automatically connected.

Tip for Xubuntu Users

by default
gedit is not available in Xubuntu and Xubuntu users must replace bluez-utils with bluetooth . Everything else is exactly the same as described

August 6, 2008

Ubuntu : How to install RPM packages in ubuntu

If you have an rpm file for a package you wish to install, and if you cannot find a .deb debian package.You can use alien package converter to install your rpm file in ubuntu.

The alien site describes it this way :

"Alien is a program that converts between the rpm, dpkg, stampede slp, and slackware tgz file formats. If you want to use a package from another distribution than the one you have installed on your system, you can use alien to convert it to your preferred package format and install it."

Installing Alien

Installing alen is an easy task with Ubuntu


$sudo apt-get install alien


This command will get and install the alien from ubuntu depositaries, sometimes you might need to run the apt-get update command before executing the above command.

How to convert a .rpm file to .deb file

To install the .rpm file, you first need to convert it to the debian package (.deb) file.Only debian packages can be installed in Ubuntu directly.

Assume that we have our rpm package with name name-of-rpm-file.rpm. You can convert it using the following commands.

$sudo alien -k name-of-rpm-file.rpm

This command will convert the .rpm to a .deb.

- The “-k” will keep the version number. Otherwise alien adds a “1″ to the version number.

Now everything is ready, and the debian package is available in the directory.


How to install the debian package


We have the converted file in our directory.Now we can install the package using the newly generated debian package (.deb file).To install the debian package you just need to type

$sudo dpkg -i name-of-deb-file.deb

in your terminal window.


Hope this works for you.Fore more information and help on alien, just have a glance at the man page or drop a comment here.


Ubuntu : How to enable the root account

Ubuntu is one of the few Linux distributions out there that will not enable the root account, You might have noticed that unlike the other Linux distributions the Ubuntu is not asking for the root password while the installation is being done.This is why we are not able to access the root account.

How to enable root account ?

Enabling root account is a simple task, simply type
sudo passwd root
in your terminal window to change the root password.

Disabling the root account : sometimes you might need to disable the root account,

sudo passwd -l root
type this command in the terminal window, and it will disable the root account.

NB: it is suggested that you use the sudo command instead of using the root account.

July 29, 2008

Entertainer : An open mediacenter solution for you

One of the most important aspect of why I wasn't shifting from OS X to Linux was lack of good Media center capabilities of Linux, So this week I've been searching for one and found entertainer, a new simple elegant and fresh looking Media center solution for Linux Machines. I think I started changing my mind.

Entertainer

Entertainer is a simple easy to use media center solutions for Linux machines with Gnome and XFace desktop environments. It is developed in Python.The Entertainer is still a kid in the open world but the developers are working hard to make it better.


Features

So let us have a look at the features that Entertainer offers.

Movies and TV-series

You can watch movies and TV-Series from your hard drive or any drive linked over the network. Entertainer even has meta data and cover art support.

Music library

You can now play all our

favorite music tracks easily, there are options that enables navigation of music by artist album,etc.We can even create custom play lists.Entertainer automatically downloads the art work and music information.

Photographs

Entertainer includes a photograph library, which allows you easily find your best shots.

Headlines

This is a cool feature that helps you to watch your favorite feeds even while you are resting in your sofa.

Weather

Entertainer can tell you the weather forecast at your, or any other location for the next 4 days. Quickly check if you need to pack that umbrella or your shots today.

Themes

Entertainer supports theming ! It is a disappointing factor now, because I was not able to find any new themes in the official site.


Turnoffs :(

Entertainer doesn't have any remote support.Currently it only supports keyboards to control it.The other main thing is several times entertainer fails due to bugs.Hope some of you can contribute by working on them.


How do you install entertainer in Ubuntu?


Okey now let's have a look at how I installed entertainer in my System.I've been trying entertainer in Ubuntu Hard y Heron, I've some install instructio ns if you prefer to spice up your Ubuntu.In order to install entertainer we need to have some packages installed.

Prerequisites


sudo apt-get install python-clutter python-gobject python-gtk2 python-gst0.10 python-clutter \
python-pysqlite2 python-cddb python-glade2 python-cairo python-feedparser \
python-pyinotify python-eyed3 python-pyvorb is python-imaging python-imdbpy \
python-notify

You can copy paste this code in your terminal to get these prerequisites installed.Remember you need an act ive internet connection to do so.

Now get the source code


  • svn checkout http://entertainer-media-center.googlecode.com/svn/trunk/ entertainer

You can grab the source code from entertainer using the above code by just typing it in your terminal. Okey when the source code is completely grabbed change directory to entertainer (cd entertainer).

Copy the configurations to your Home

  • cp cfg ~/.entertainer -R

when you are done,change directory to src (cd src)

Set Media Locations

Now we can add folders and locations where our media files located in our machine.

typing this code will show a window where you can add your media files.

  • ./entertainer-content-management.py

Now we are almost done.

Preparing the index

Type ./entertainer-backend.py in the terminal and let the entertainer prepare for the work.

just type ./entertainer-frontend.py to fire-up the Entertainer.

Now it's time for entertainment

You can control your Entertainer using keyboard :(

  • F - Toggle full screen on/off
  • P - Toggle pause/play when video or audio is playing.
  • S - Stop playback
  • H - Navigate to home screen. Press this anywhere and main menu will be displayed.
  • I - Toggle information view when watching photograph in full screen mode
  • 1,2,3,4 - Change video playback aspect ratio
  • Arrow keys - Navigate menus
  • Enter - Select current menu item
  • Backspace - Navigate to previous screen

Hope this is pretty easy work for all of you and you enjoy Entertainer, Please drop a comment if you need any help or if you have any doubt regarding the installation.

http://www.entertainer-project.com/ is the official Entertainer website.

June 22, 2008

Ubuntu 8.04: Hardy Heron

The Ubuntu 8.04, the most anticipated releases of Ubuntu to date.

Ubuntu 8.04 : Hardy Heron is a LTS release.LTS release means that this release will receive continuous support and security updates for three years for desktop users and five years for server users.So the major focus of this release will be on stability and enhancement of existing features.


Features

  • The Hardy Heron is packed with GNOME 2.22.GNOME 2.22 is based on GVFS instead of the old GNOME-VFS system, this comes with an entirely new backend, and ensures a better look and feel with more speed and compatibility.
  • The other noticeable feature is the Brasero disc burning utility (easy to use cd and dvd burning utility)
  • Transmission, a new BitTorrent client.PulseAudio is a major application bundled with ubuntu which enable the user to control the volume of individual applications.
  • For better browsing experience they included Firefox 3 package.
  • Ubuntu ships with Openoffice for complete office productivity
  • The Ubuntu help and support feature is more better with this version.
Security is more important when it comes to an operating system, and like every linux Ubuntu is more secure.

To know more about Ubuntu security click here
Help for security related installations can be found here

System Requirements

Ubuntu is available for PC, 64-Bit PC and Intel based Mac architectures. At least 256 MB of RAM is required to run the alternate install CD (384MB of RAM is required to use the live CD based installer). Install requires at least 4 GB of disk space.


Explore more features at Ubuntu Tour

Download your ISO images from Here

June 15, 2008

JeOS - An Ubuntu flavour for Virtual Appliances


Ubuntu JeOS (pronounced” juice”) is a variant of the Ubuntu Server operating system, configured specifically for virtual appliances.


What is this Virtual Appliances ?

Wikipedia defines it as - A virtual appliance is a minimalist virtual machine image designed to run under some sort of virtualization technology (like VMware Workstation, Citrix XenServer, VirtualBox or many others). A virtual appliance is usually built to host a single application.

Virtual appliances are an effective and efficient way to distribute applications even if it is a commercial product and the best part is the Customer can simply kick start the virtual machine and start using the application.


What is JeOS ?

JeOS is the abbreviation for Just enough Operating System,configured or customised to fit a particular applications needs.Ubuntu JeOS is a varinat of the Ubuntu Server OS, configured specially for virtual appliances (it is said to be tuned to take advantage of the key performance technologies in the latest products from VMware,I found it working pretty good with the Virtual Box too).The JeOS is available as a CD-ROM ISO image for downlaod (barely 100MB).Ofcourse ubuntu packed JeOS wisely with only necessarry drivers and a minimal required packages,thus enabling Indipendent Software Vendors to configure their suporting os exactly as they require.Even thought they prefer to use VMWare for the optimised performance,it worked with the Sun's Virtual box without any problems.

Installation of Ubuntu JeOS

The user need to have a virtualization environment already installed (they prefer VMware, It even works farely with the Virtual Box).Anyone with a little knowledge of how to use a text based editor such as vi or nano can easily do this by following the Ubuntu Documentation.


Here is the JeOS How-to article by Ubuntu documentation.


  • I was planning to write a complete JeOS How-to on the Ubuntu JeOS but pretty much impressed with the Ubuntu documentation.The documentation seems very good and everything is clearly explained.So I just need to recommend this.

Here is the Ubuntu Server Guide if you want to learn more.

You can visit the official page of JeOS here.


Thanks for the Ubuntu documentation on JeOS for the informations